Swift Static Website Generator
I am a passionate software engineer, and I currently love the Swift programming language. So, when I was tasked with creating a personal site for myself, I looked into some sort of solution using Swift. Today there are several ways to create a website and static site generation is very popular. When I searched Google for "swift static site generator" a new and exciting tool was the first result.

To create my personal site, Kprow.com, I used Publish, a static site generator built specifically for Swift developers. How cool is that? The idea of creating full websites using Swift thrilled me and elevated me to learn something new. And as I dove deeper there were more and more open source tools to support Swift developers in making websites.
So, before I continue I want to give a shout out to John Sundell for maintaining many open source tools to be able to create in Swift. Please checkout his extensive github portfolio here. His most notable tools include:
- Plot - a Swift solution to write typesafe HTML.
- Ink - a Markdown parser written in Swift.
- Files - A wrapper around the Foundation framework's FileManager to nicely handle files and folders in Swift.
All of these tools are used under the hood in Publish to generate a static website.
So, what is a static website and why do I want one?
A static website contains web pages coded in pure HTML and CSS that are fixed content. This means that when anyone visits your website, they get the same content as everyone else and it's not dynamic. Dynamic websites usually connect to a database or some sort of Content Management System(CMS) to produce it's content on the fly.
Static websites are fast
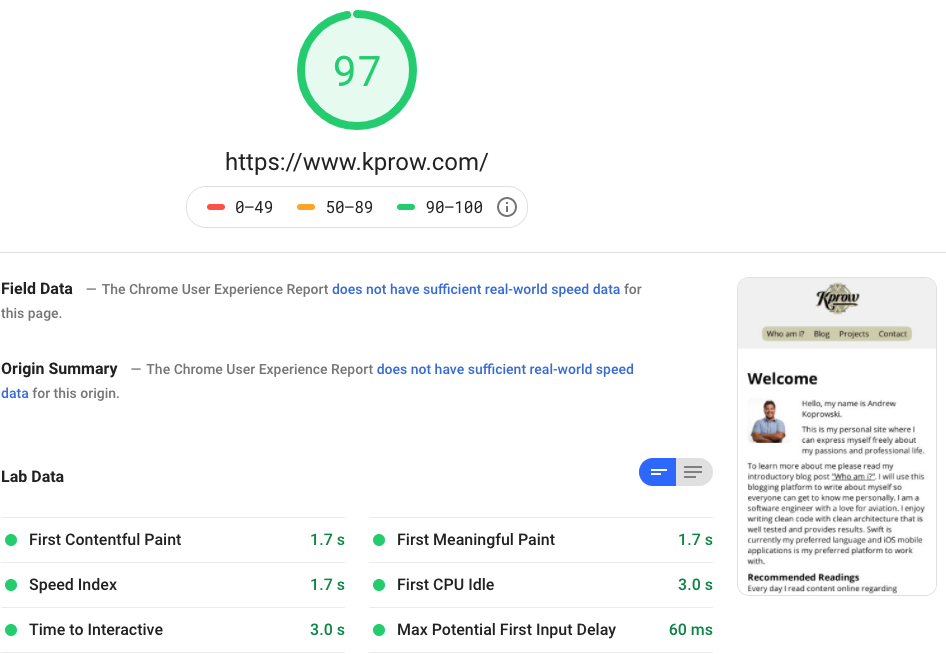
Static sites have the benefit of being incredibly fast. The server only serves static content which can be rendered by any browser. There are no database calls or dynamic content to fetch and generate. Since content is pre-generated the time to first byte(TTFB), a measurement of time that it takes from the initial request to when the first piece of data is received by the browser, is extremely fast. Google has a tool to calculate and analyze your website's speed and efficiency. Click on the image to see my Google Page Speed Analysis, or click here to see it live. See, I told you it's fast. And this is important because statistics show people will abandon your website if it doesn't load quickly. User expectations are only getting higher and a website needs to load in the milliseconds. This is why TTFB is so important.
Static websites are simple to host
Also, hosting a static site is simple. The host only needs to serve files and does not need to concern itself with any type of backend support. Static sites have become super popular with hosting providers, and there are many inexpensive or free ways to host your static site. This was a huge benefit for my personal site, because I did not want to spend any money on hosting. Netlify is the hosting provider I chose, because it was free for my use case, and they have a Content Delivery Network(CDN) that focuses on a great TTFB. Github Pages in another solution to host a free static site. Also, another inexpensive and very reliable host is Amazon S3. Amazon Web Services(AWS) is in the lead for cloud hosting, and their CDN is unmatched, however, it comes with minimal costs.
Static websites are secure

There is no server management with static sites. You don't need to worry about updates, patches, or running the latest version of WordPress or PHP. You're always up to date. Since there is no backend or database to hack, the website is just not vulnerable. In fact the OWASP Top Ten do not apply to static websites. OWASP is a non profit foundation that works to improve the security of software. They provide education along with a list of insecurities seen in the wild. If my website is inherently secure that just means less headache and less maintenance, a big plus for my personal website.
Static websites are easy
I wanted a simple workflow that would encourage me to write more. The developer experience after creating the static site is very minimal. I write a blog post in Markdown then add the new file to my version control, which is set up for continuous deployment. All I have to do is build my project in Xcode, which creates the new content in an Output folder, this folder is what gets released as my full website. It's automatic, continuous and error free.
As you can see there are many benefits to having a static website, so I was ecstatic to find a solution in my favorite programming language, Swift. Publish is quite minimal, and very easy to use. My website is defined as a Swift package and acts as a configuration of how my site should be generated. And it's all done using statically typed, native, compiled Swift code.
Now onto the code
My website is generated using only 2 Swift files, my main.swift which acts as a configuration and extends Publish's Website protocol, and my theme file Theme+Kprow.swift. When I hit run in Xcode, it compiles my type safe configuration and theme as part of the build step, then it gathers my content and generates my html as part of the run step.
Hitting the play button in Xcode for my project simply runs the main.swift file which started out very simple, and the last line of code was
// This will generate my website with my custom theme.
try Kprow().publish(withTheme: .kprow)
The above code, is what generates the final HTML to be hosted on Netlify.
It's that simple. My configuration to begin with was as follows:
// This type acts as the configuration for your website.
struct Kprow: Website {
    enum SectionID: String, WebsiteSectionID {
        // Add the sections that you want your website to contain here:
        case posts
        case projects
    }

    // Update these properties to configure your website:
    var url = URL(string: "https://kprow.com")!
    var name = "Kprow.com"
    var description = "Hello, my name is Andrew Koprowski."
    var language: Language { .english }
    var imagePath: Path? { "images" }
}
At first, I began by using the Foundations theme provided by John Sundell with the Publish package. However, as I started developing I quickly saw the need for my own theme. To create your own theme you extend the Theme struct, and create a static variable that configures your new theme.
public extension Theme {
    static var kprow: Self {
        Theme(
            htmlFactory: KprowHTMLFactory(),
            resourcePaths: [
                "Resources/KprowTheme/styles.css"
            ]
        )
    }
}
Then the KprowHTMLFactory is the main implementation that defines the HTML to create for each part of your website, including your index file(home page), sections, pages, single items, tag details and tag lists. So, kprow.com has 2 sections: posts, and projects and their respective HTML are generated by the following method:
func makeSectionHTML(for section: Section<Site>,
                         context: PublishingContext<Site>) throws -> HTML
You can see that the return type is HTML, which is a Plot defined structure, if your curious click here to see what it looks like.
Then each individual item, for example my Who am I blog post, is generated using the following method implementation.
func makeItemHTML(for item: Item<Site>,
                    context: PublishingContext<Site>) throws -> HTML {
    HTML(
        .lang(context.site.language),
        .head(for: item, on: context.site),
        .body(
            .class("item-page"),
            .header(for: context, selectedSection: item.sectionID),
            .wrapper(
                .article(
                    .div(
                        .class("content"),
                        .contentBody(item.body)
                    ),
                    .span("Tagged with: "),
                    .tagList(for: item, on: context.site)
                )
            ),
            .footer(for: context.site)
        )
    )
}
This is what writing HTML in Swift looks like. To me, this is very exciting 🤩. No more forgetting to close a tag, </span> which can ruin the entire page content. Instead Xcode gives us rich autocomplete suggestions for nodes (HTML elements), and all supported attributes for those nodes. Plot uses Swift generics to implement HTML elements and their attributes as context-bound nodes which enforces valid HTML. This means you can create your own custom components for your own use, but also the already supported HTML nodes are robust and provide compiler errors for misuse. For example, a compiler error would occur if adding an href attribute to a paragraph, <p>, element. This is not allowed in HTML and our compiler recognizes this before even generating our content.
let html = HTML(.body(
    // Compiler error: Referencing static method 'href' on
    // 'Node' requires that 'HTML.BodyContext' conform to
    // 'HTMLLinkableContext'.
    .p(.href("https://github.com"))
))
This makes writing HTML much less error prone. In addition, another benefit I see is that it makes HTML easier to write. I have a hard time remembering all of the elements that are required or allowed to be inside the <head> tag. When writing my head element in Plot, I get very useful autocomplete suggestions like the .siteName element or the .twitterCardType element.
let headHTML = .head(
            .encoding(.utf8),
            .script(.async(), .src("/myJavascript.js")),
            .siteName(site.name),
            .url(site.url(for: location)),
            .title(title),
            .description(description),
            .link(.href(Kprow.googleFontUrl), .rel(.stylesheet), .type("text/css")),
            .twitterCardType(location.imagePath == nil ? .summary : .summaryLargeImage),
            .forEach(stylesheetPaths, { .stylesheet($0) }),
            .viewport(.accordingToDevice),
            .unwrap(site.favicon, { .favicon($0) }),
            .unwrap(rssFeedPath, { path in
                let title = rssFeedTitle ?? "Subscribe to \(site.name)"
                return .rssFeedLink(path.absoluteString, title: title)
            }),
            .unwrap(location.imagePath ?? site.imagePath, { path in
                let url = site.url(for: path)
                return .socialImageLink(url)
            })
        )
I've always been on the search for an easier way to write HTML, and with Plot I feel I have found it.
Conclusion
Publish is a simple yet robust solution to create static websites in Swift it also has plugin support and the ability to build your own theme.
I really enjoyed learning and creating a website in Swift. I will be adding this to my toolbox and perhaps building many more websites with it in the future.
Check out the original video I saw of John Sundell previewing Publish at Server Side Swift, a conference in Denmark, run solely for the love of server-side Swift. This event happened in October, 2019 and Publish has come a long way since then. Keep that in mind when watching the code examples.
What's Next?
After the basic setup was complete, there were a few more tasks that were needed in order for it to be a production ready website for the masses.
- Code highlighting was needed for my first project write up, Swift Of Life. Once again, open source tools written by John Sundell came to the rescue. Splash is a Swift syntax highlighter that is fast and only requires a small amount of CSS. Plus a plugin for
Publishwas available so it was easy to add to my workflow. - A contact form, so users could communicate with myself for any reason. I used a landing page created inside Mail Chimp.
- Custom fonts to liven up the look. I used Google Fonts
- Analytics to track the usage and popularity of my site. I used Google Analytics.
- Comments, so users can communicate with each other and with myself as the writer. I plan to use Disqus because a plugin for
Publishhas already been created, and it's a free, well known, and popular solution. - Perhaps in the future, I will want to pull content from some external source, I could write a plugin to support this.
Thanks for reading. Don't forget to keep checking back as I update this website, add features and more content. Please contact me with any feedback concerning this post. As always,